Interfacing Teletypes and Paper Tape · Volume 2
Interfacing Teletypes and Paper Tape — Vol 2: Loop Supplies, Old and New
The station rectifiers and Navy supplies the machines were built for, the hobbyist's transformer-and-resistor supply, spark suppression on the contacts, and a complete modern design: 48 volts, a MOSFET current sink and a clamp, worked through value by value.
2.1 What a loop supply has to do
Vol 1 reduced the loop to physics. A loop supply turns that physics into a specification, and it is worth writing the specification down before looking at any circuit, old or new:
- Deliver the design current — 60 mA or 20 mA — on a steady mark, and hold it there whatever is in the loop.
- Have enough compliance voltage to deliver that current through every magnet, keyboard and wire in series.
- Pull the magnet in fast on each space-to-mark transition.
- Let it go just as fast on each mark-to-space transition, without an arc or a destroyed transistor.
- Keep make and break symmetrical, so that the receiver sees no bias (Vol 1).
- Be isolated from the mains, and from anything else it connects to.
- Be measurable and adjustable, with a meter or a meter jack and a way to set the current.
- Fail safe: fused, enclosed, and not able to hurt the person working on the machine.
Every design below meets some of these and trades away others.
2.2 The supplies the machines were built for
In service, a teletype rarely had a supply of its own. It drew loop current from the office, the exchange or the ship’s communication centre, and those supplies were substantial pieces of equipment.
Bell System station rectifiers. Teletype’s 1964 wiring-diagram section for “rectifiers for teletypewriter station apparatus” shows a family of them, and the typical one is instructive. It is built around a ferroresonant transformer, a constant-voltage transformer that holds its output against mains variation, feeding a rectifier stack and a 1250 µF filter capacitor. Its output is marked 75/120/130 V DC at 0.20 A, and the installer was told to move a tap if the output “exceeds 135 volts under load” or is “below 125 volts under load”. Two hundred milliamperes is three and a bit 60 mA loops.
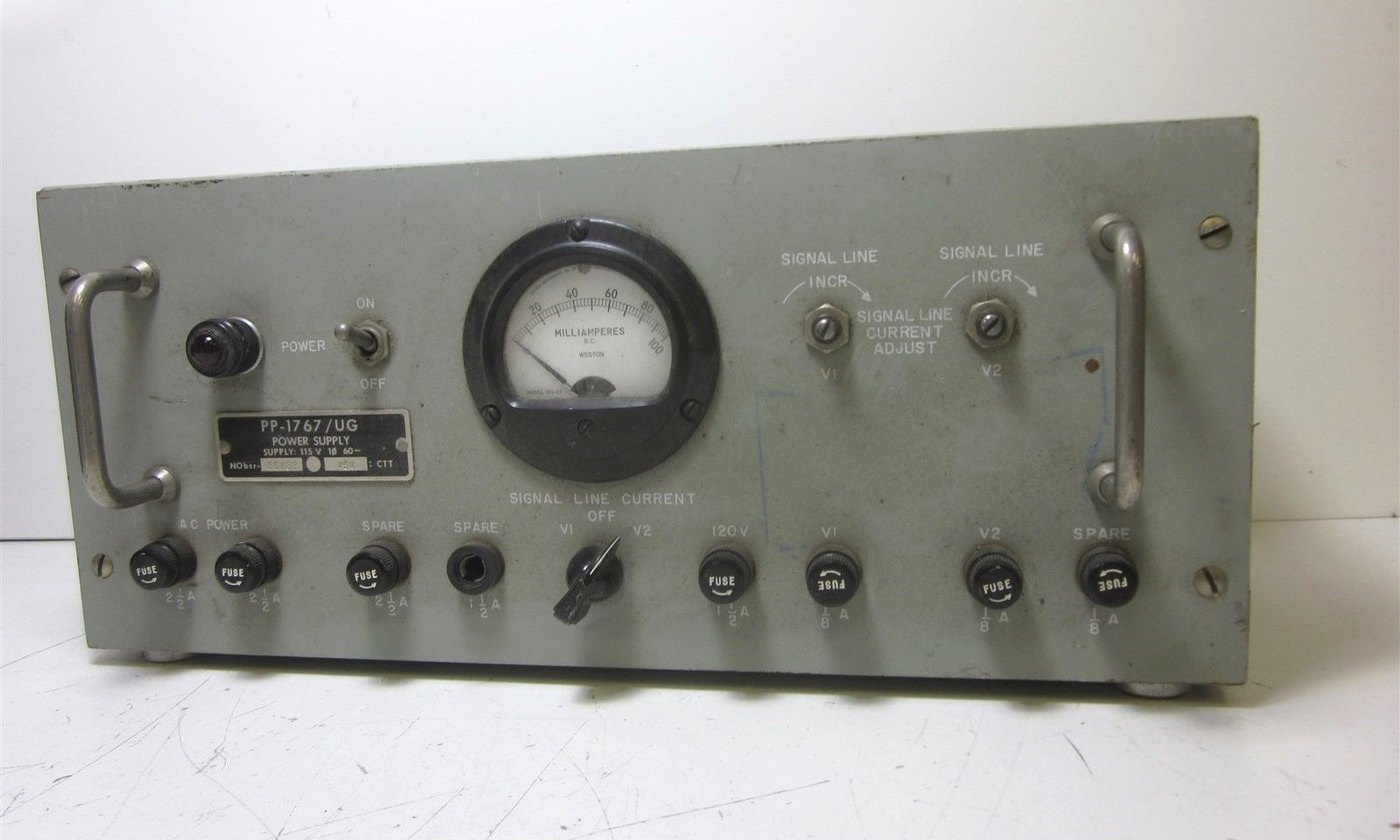
US Navy loop supplies. The Navy’s equipment shows the same ideas at a larger scale. A PP-610/U supplied 120 V DC at 125 mA. A PP-424/U was rated 200 mA, and the Navy’s description of the TT-23/SG teletype panel it fed spells out the arithmetic: “each loop requires 60 milliamperes for efficient operation”, so four loops drawing current at once overload it. The PP-1767 series, used in the AN/SGA-3 crypto system, supplied 120 V DC at 1 A plus two separate 33 V, 60 mA outputs, with magnetic-amplifier regulation in the later versions. The later PP-3494A/UG offered a regulated 48 V or 120 V DC at 0.4 A.
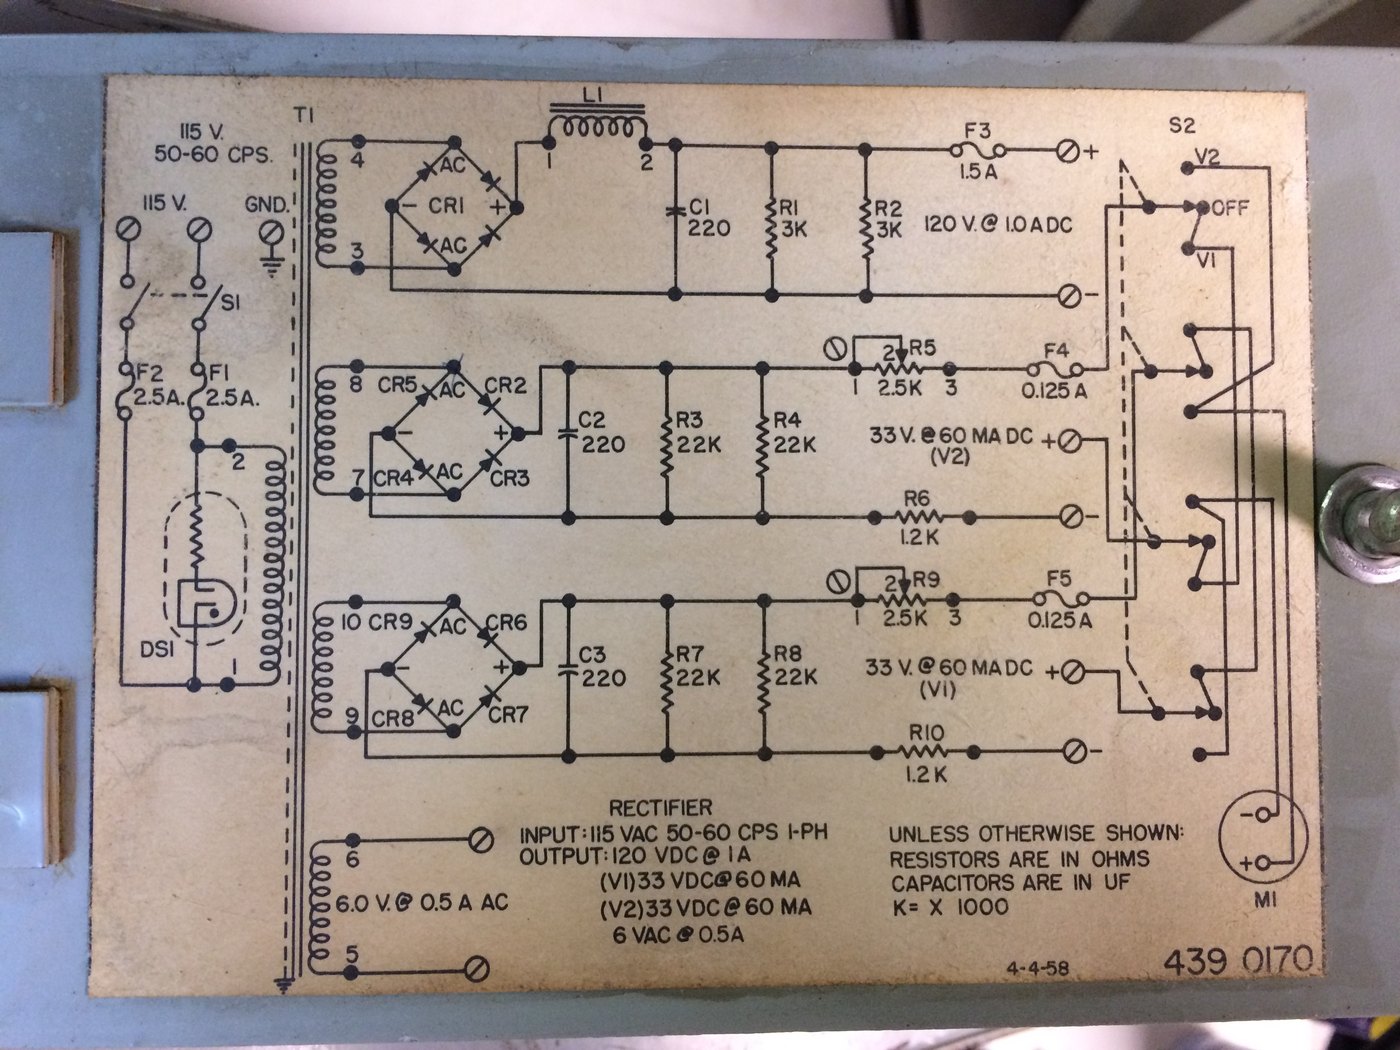
That circuit plate is the classic loop supply in one picture: a transformer for isolation, a bridge, a capacitor, bleeder resistors, an adjustable resistance, and a meter switched between the outputs. It is also a reminder that the Navy saw no need for 120 V on every circuit. The two 60 mA outputs run at 33 volts.
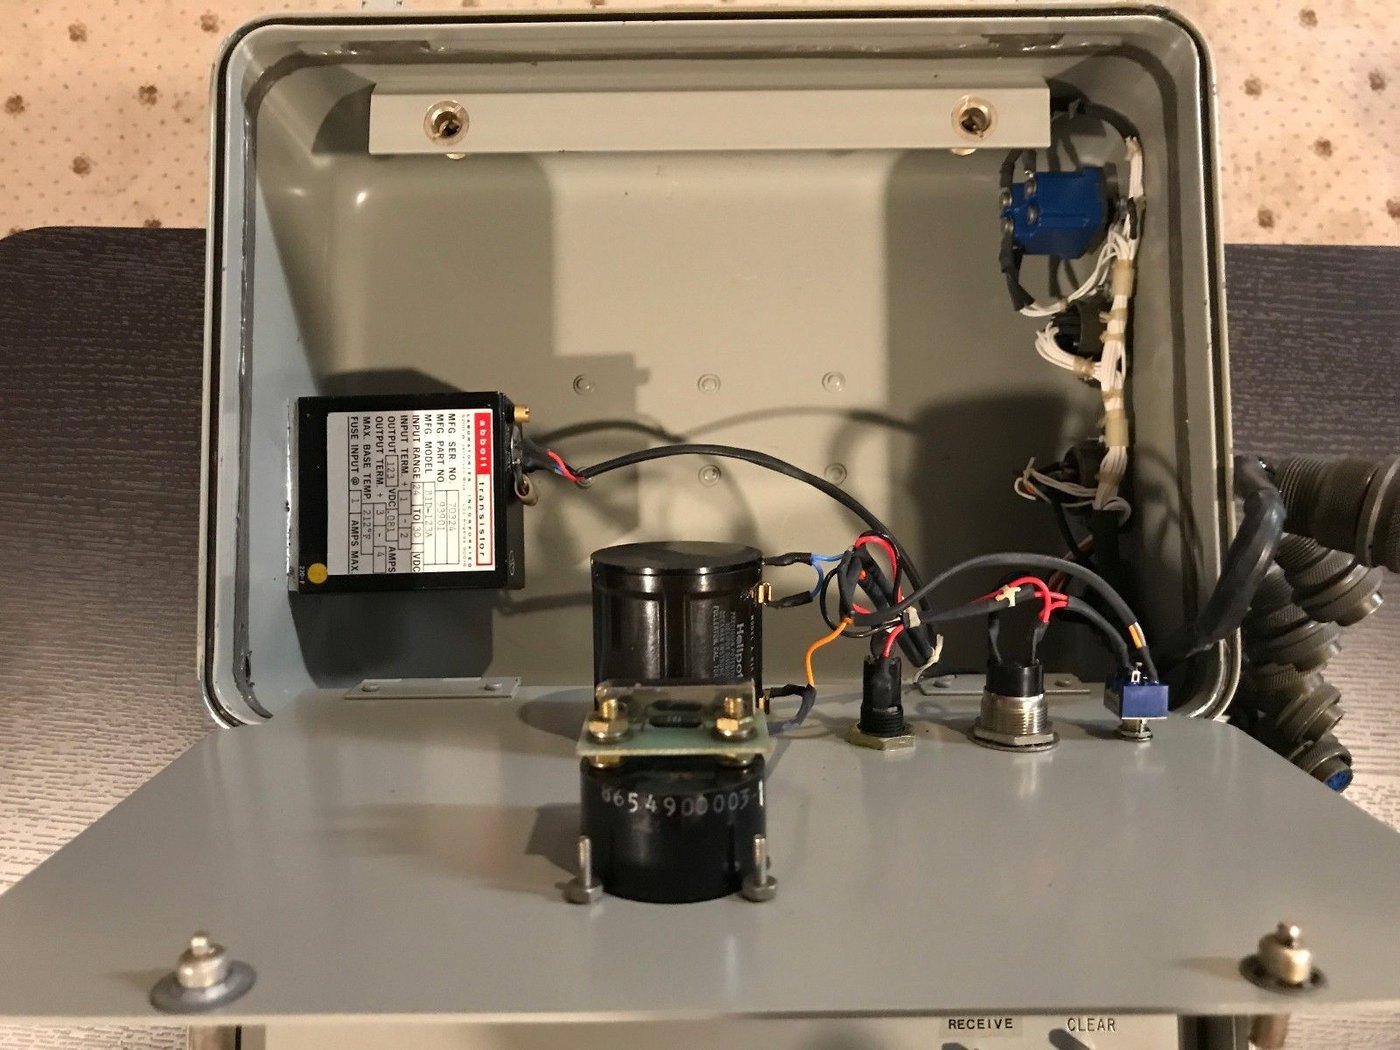
Terminal units. Amateur stations usually took their loop current from the terminal unit. The HAL ST-6 and ST-5000 both contain “a 175 volt, 60 ma. loop power supply”. The ST-6 manual records a running change that tells its own story about heat: “The 2500 ohm loop pot is no longer available. A fixed, 2750 ohm, 20 watt resistor is supplied that replaces both the loop pot” and its companion. At 60 mA, 2750 Ω dissipates
P = 0.060^2 x 2750 = 9.9 Winside the terminal unit, continuously, whenever the loop is idle. The ST-5000 keys that loop with a single 2N5655 high-voltage switching transistor driven from the slicer.
2.3 The hobbyist’s classic
For most of the history of amateur RTTY, a home-built loop supply followed the shape of those station rectifiers, scaled down to one loop:
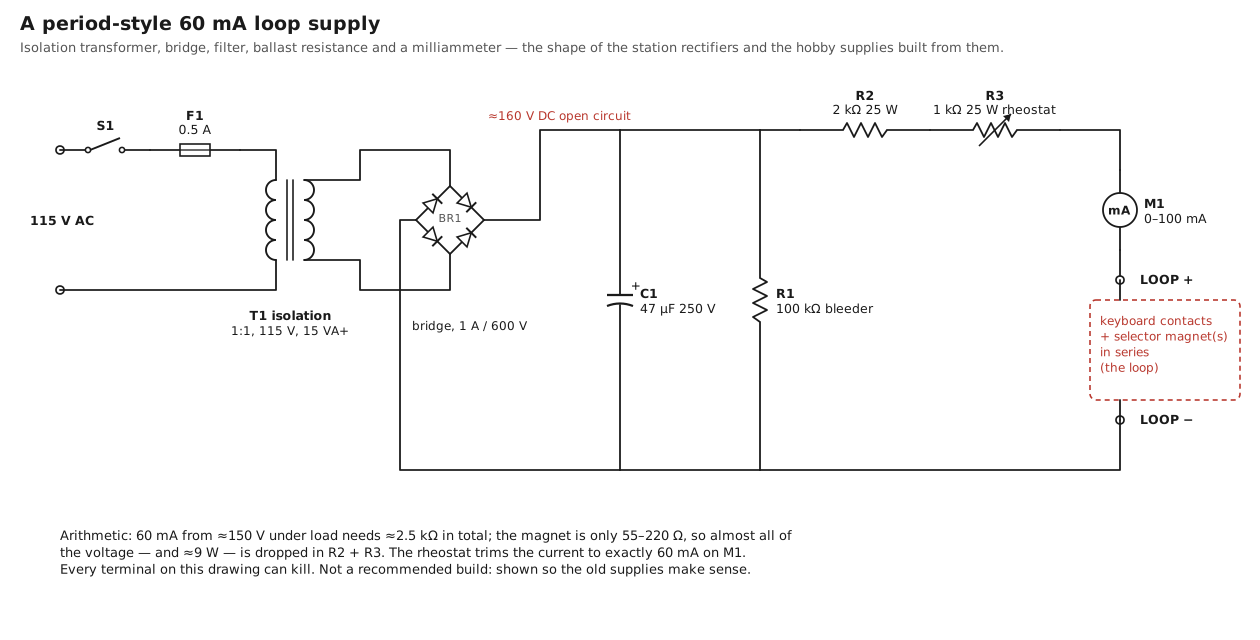
The design choices are each a response to one of the requirements above.
- The isolation transformer (1:1, 115 V) separates the loop from the mains, so that neither side of the loop is tied to the neutral or the earth. Without it, one terminal of the loop is at mains potential.
- The bridge and capacitor turn about 115 V RMS into about 160 V DC unloaded. A 47 µF capacitor ripples by about
0.060 / (120 × 47 µF) ≈ 11 Vpeak to peak at 60 mA, so the voltage under load is about 150 V. The ripple barely matters, because the resistor turns it into a 6 per cent current ripple that the magnet’s inductance smooths further. - The ballast resistance is the current-setting element. A 2 kΩ fixed resistor plus a 1 kΩ rheostat covers 48 to 73 mA from 150 V into a 55 Ω magnet. It dissipates about 9 watts, and it needs a 25 W rating and free air. Those resistors, and the rheostat, are the parts that get hot.
- The meter reads the current directly. The operator sets 60 mA on a steady mark and checks it again after the resistor has warmed up.
- The bleeder discharges the capacitor when the supply is switched off.
Some builders used an incandescent lamp in place of part of the ballast resistance. A lamp filament’s resistance rises steeply with temperature, so it behaves as a crude current regulator: if the loop resistance falls, the current rises, the filament heats and its resistance rises to oppose it. It also makes the loop current visible from across the room. The price is a slow, nonlinear response and a component whose cold resistance is a fraction of its hot resistance, so the current overshoots at switch-on. It is a period trick, worth knowing when a lamp turns up in an old supply, but there is no reason to copy it.
What the classic supply does well is requirement 3: the 2.5 kΩ in series gives the 2 ms time constant of Vol 1. What it does badly is everything else. It runs at a voltage that can kill, wastes nearly all its power, and leaves requirement 4, the release, to whatever opens the circuit.
2.4 Spark suppression on the contacts
Every time a keyboard or transmitter-distributor contact opens a 60 mA inductive loop, the magnet’s stored energy tries to keep the current flowing. With nothing else to absorb it, the voltage across the opening contact rises until the air breaks down, and the contact arcs. The arc erodes the contacts, pits them and builds up oxide, and it radiates.
Teletype treated the radio-frequency part as a problem in its own right. A 1957 Bell System installation section describes the TP97301 filter unit for line relay contacts of Model 14 teletypewriters and typing reperforators, whose function is “to suppress radio frequency induction from the line relay contacts of these machines”. The kit is a filter assembly, a replacement resistor and two screws, wired across the relay contacts. In a radio shack, where the teleprinter sits a few feet from a receiver, the same interference shows up as clicks on every character.
The general remedies are the same today:
- An RC snubber across the contacts, typically around 100 Ω in series with 0.1 µF, rated for the loop voltage. The capacitor absorbs the first rush of current when the contact opens, slows the voltage rise until the gap is wide enough not to arc, and the resistor limits the discharge current when the contact closes again.
- A clamp across the coil. This attacks the cause rather than the symptom. If the magnet’s energy has its own path, a diode and a zener in series across the coil, then the current circulates in the coil and the clamp when the loop opens, and the contacts only ever see the supply voltage plus the clamp voltage, with very little energy behind it.
- Never a plain diode across the coil. Vol 1 shows why: the magnet then releases with its own 73 ms time constant, and it misses the next element.
The two modern designs below use the clamp at the coil, or its energy-recovering equivalent, as the main measure, and keeps a small RC snubber across the keyboard contacts for whatever stray inductance remains.
2.5 Design A: a 48 V constant-current loop supply
The Navy’s two 33-volt outputs and Teletype’s own 40-volt selector-magnet driver (Vol 1) point to the design. If the current is set by an active current regulator instead of a resistor, the supply voltage no longer has to be high enough to make the time constant short. A current regulator looks to the coil like a very large resistance, so the full supply voltage appears across the coil during the rise, and the current ramps up as fast as V/L allows. Then the regulator holds it at 60 mA. Add a clamp that lets the current down at the same rate it went up, and the make and the break are mirror images.
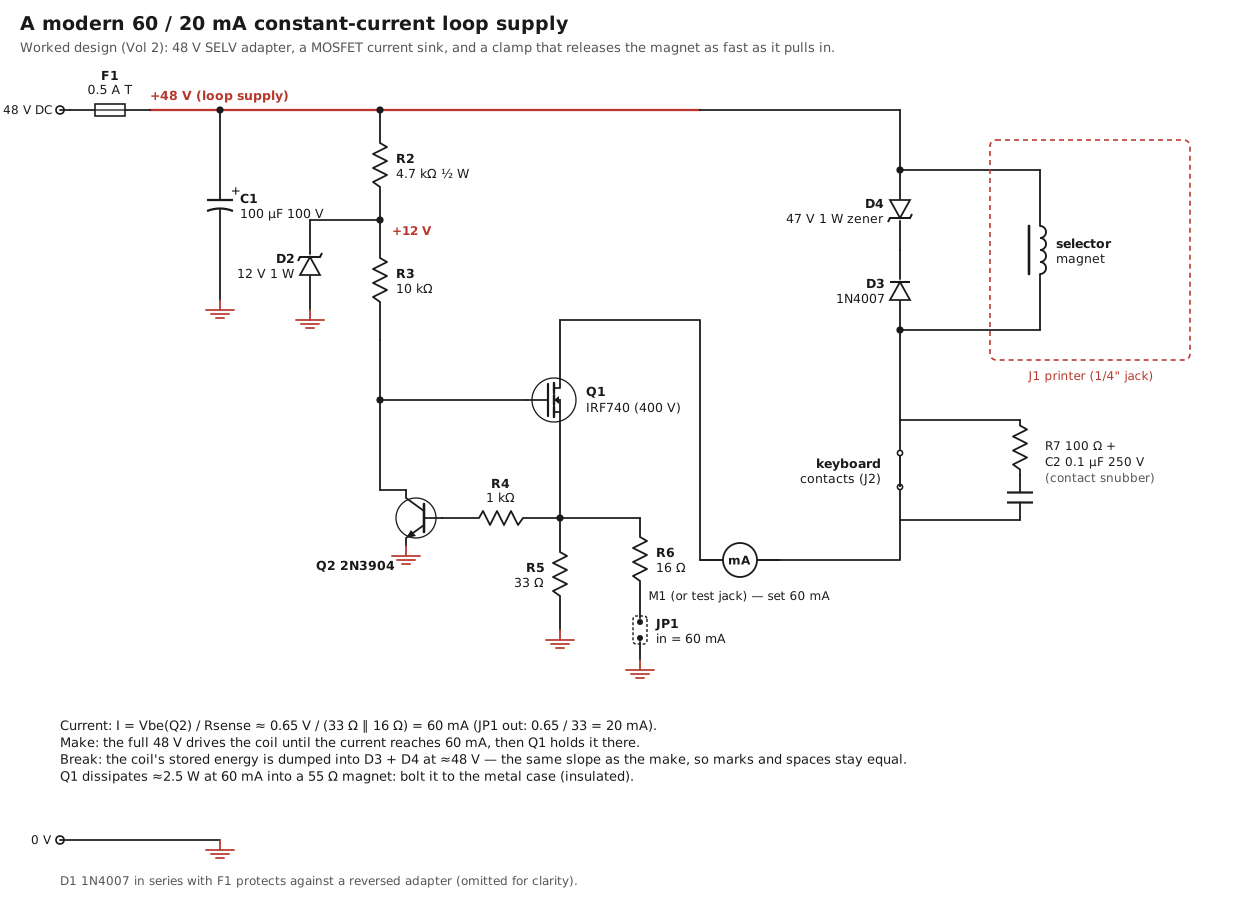
Supply voltage: 48 V. A desktop adapter of the kind sold for network equipment, such as a Mean Well GST25A48-P1J (48 V, 0.52 A, 25 W). It is isolated from the mains by its own construction, it is current-limited, and it is under the 60 V DC level that touch-safe equipment standards use (Vol 1). With 4 H to drive, the current rises at
dI/dt = V / L = 48 V / 4 H = 12 A/s -> 0 to 60 mA in about 5 ms, through 30 mA at about 2.5 msThat is slower than a 120 V resistor loop reaches its half-current point (about 1.4 ms in Vol 1’s simulation) but, as the next paragraph shows, it can be made symmetrical, and symmetry is what the receiver needs.
The current sink: Q1, Q2, R5, R6. Q1 is an N-channel MOSFET in series with the loop, on its negative side. Its gate is pulled up to a 12 V rail through R3, so it turns on hard until the current through the sense resistor at its source develops about 0.65 V. At that point Q2 turns on and pulls the gate down just enough to hold the current there:
I = Vbe(Q2) / Rsense
20 mA:  Rsense = R5           = 33 ohm            -> 0.65 / 33   = 19.7 mA
60 mA:  Rsense = R5 || R6     = 33 || 16 = 10.8 ohm -> 0.65 / 10.8 = 60.3 mA   (JP1 fitted)
R4, 1 kΩ, protects Q2’s base. The two-transistor current limiter is decades old; its virtue here is that it has no reference to drift and nothing to adjust. Its weakness is temperature: Vbe falls by about 2 mV per °C, so if Q2 warms by 30 °C, the current falls by about 9 per cent. Keep Q2 away from Q1’s heatsink. For a tighter current, replace Q2 with a TLV431 shunt reference (1.24 V) and scale the sense resistor accordingly.
The gate rail: R2 and D2. A 4.7 kΩ resistor from 48 V into a 12 V, 1 W zener gives a 12 V rail at about 7.7 mA, enough to pull up the gate through R3 with plenty to spare, and well inside the IRF740’s ±20 V gate rating. R2 dissipates 0.28 W; a half-watt part is enough.
Compliance. The sink needs about 2 V across Q1 and 0.65 V across the sense resistor to regulate. The largest loop it can drive at full current is therefore
60 mA:  (48 − 2.7) V / 0.060 A = 755 ohm of magnets, keyboards and wire
20 mA:  (48 − 2.7) V / 0.020 A = 2265 ohm
That is a holding magnet (55 Ω) or a pulling magnet (about 220 Ω) with plenty of room for a keyboard and a second machine in series.
Dissipation in Q1. Whatever voltage the loop does not use, Q1 burns:
Table 1 — Dissipation in Q1. Whatever voltage the loop does not use, Q1 burns
| Load in the loop | Voltage across Q1 at 60 mA | Q1 dissipation |
|---|---|---|
| 55 Ω holding magnet | 48 − 3.3 − 0.65 ≈ 44 V | ≈ 2.6 W |
| 220 Ω pulling magnet | 48 − 13.2 − 0.65 ≈ 34 V | ≈ 2.0 W |
| two 55 Ω machines in series | ≈ 41 V | ≈ 2.4 W |
| any loop at 20 mA | ≤ 47 V | ≤ 0.95 W |
Two and a half watts is a quarter of what the ST-6’s resistor burned, but it still needs a heatsink. A TO-220 MOSFET bolted to the wall of a die-cast aluminium box through an insulating pad, such as a Hammond 1590BB with a Boyd 4880SG kit, runs a few tens of degrees above ambient. The tab is the drain and sits at loop potential: always use the insulator. For anything larger, a linear regulator is the wrong tool; the DeRamp board’s regenerative switching approach (Making the Parts That No Longer Exist, Vol 2) removes the dissipation altogether.
The clamp: D3 and D4. A 1N4007 and a 47 V, 1 W zener (1N4756A) in series across the selector magnet, the diode’s anode at the end of the coil that goes to Q1. When the loop opens, the coil’s current continues around the coil, the diode and the zener, and the coil sees about −48 V across it. That is almost exactly the +48 V that drove the rise, so the current falls at the same rate it rose. Vol 1’s simulation gives the result: 2.60 ms to cross the half-current level on the make, 2.38 ms on the break, a bias of about −1 per cent. The classic 120 V resistor loop with the same clamp manages +4.6 per cent.
Choosing the zener voltage is choosing the bias. A lower clamp voltage releases more slowly and lengthens the marks; a higher one releases faster and shortens them. The rule of thumb is that the clamp voltage should be about equal to the supply voltage. The cost is the energy: each break dumps ½ L I² ≈ 7 mJ into the zener. RYRY, the worst common case, has about six breaks per character and six characters a second, which is about 0.27 W average, comfortably inside a 1 W part.
Q1’s voltage rating. On a break, Q1’s drain rises to the supply plus the clamp, about 48 + 48 = 96 V. The IRF740 is rated at 400 V, which leaves room for whatever the keyboard contacts and wiring add.
The keyboard snubber: R7 and C2. 100 Ω and 0.1 µF, 250 V, across the keyboard contacts. With the coil clamped, the contacts open against at most about 96 V with very little stored energy behind it, and the snubber takes care of the rest.
Protection and metering. F1, a 0.5 A time-lag fuse, and D1, a 1N4007 in series with the input, protect against a short and a reversed adapter. A jack or a pair of terminals in series with the loop (M1 on the drawing) takes a milliammeter when the current is being set and is shorted by a plug otherwise. The DeRamp manual makes the same point about its own current-sense jumper: it must always carry either a shorting link or a meter, and operating with it open is a fault.
2.6 The small boards: catch the kickback, then spend it
Design A still burns about 2.5 W in its MOSFET, because a linear current regulator must drop whatever voltage the loop does not use. The real prize is to stop wasting the magnet’s energy altogether. Every break, the selector magnet hands back about 7 millijoules (Vol 1). If that energy is caught and spent again on the next make, the loop needs only a low-voltage supply to make up the losses in the copper.
Two hobby boards do exactly that, and both are proven on real Model 15s. The video that brought the idea to my attention is “Interfacing the Teletype Model 15” on YouTube (https://youtu.be/fLkBb9MuTjE), which shows the DeRamp board at work.
The DeRamp Model 15 interface (Mike Douglas). Its user manual describes the trick in two sentences: “During a mark to space data transition, the snubber circuit captures 40v-60v from the decaying magnetic field of the selector magnet onto a pair of capacitors. This captured energy is then dumped back into the loop during a space to mark transition.” The Rev A schematic shows how. The selector magnet sits between the 15 V supply and a 250 V logic-level MOSFET on the low side (TN5325, T2). When T2 turns off, the magnet’s current is steered through a fast 400 V diode (FR104) into two 1.0 µF 250 V ceramic capacitors, which charge to tens of volts. At the next mark a solid-state relay (an LH1505AB or similar) connects those capacitors to the top of the magnet, and the stored charge drives the current up quickly before the 15 V supply takes over through a 50 Ω trimmer. A second MOSFET (T1), with a 100 µH inductor and a third diode, is an optional processor-controlled boost that can add “20v, 30v, or 40v” to the capacitors during a space if a machine needs more. A PIC16F1824 runs everything, including ASCII/Baudot translation, a Baudot pass-through mode, unshift-on-space and an AFSK demodulator, and a 15 V adapter powers it. The board “generates virtually no heat”. It is designed for the Model 15’s pulling magnet (about 200–220 Ω, with a 0 Ω link for R2) or its holding magnet wired in parallel (50–55 Ω, with R2 as 150 Ω 1 W). The keyboard loop, read by the PIC through a resistor divider, runs from the same 15 V: the keyboard needs no high voltage at all once it is separated from the selector magnet. The board is sold as a bare board with a programmed PIC for $20.
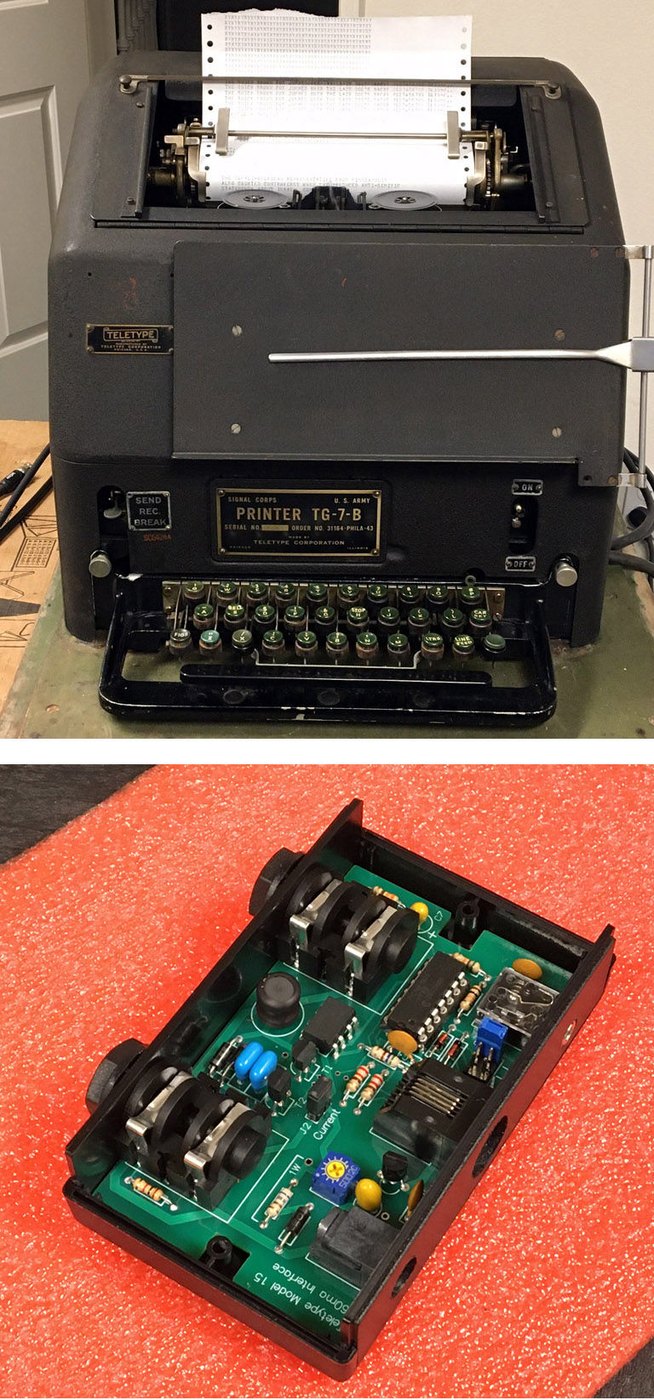
John Nagle’s ttyloopdriver. Nagle’s open-source USB board (GPL-3.0) takes the same idea from the other direction. An isolated boost converter built around an LT3750 capacitor-charging controller charges two 1 µF capacitors to about 120 V during each space. At each mark they are dumped into the magnet, and after a few milliseconds a 15 V sustain supply holds the current, which a depletion-mode MOSFET regulates at 60 mA. The board draws about a watt, all from USB, and its README reports that version 3.3 drives a Model 15 and has been used on a Model 28. Its weak point is parts: it relies on a CP2102 reprogrammed to alias 600 baud to 45, and the CP2102 is “not recommended for new designs”, while the CP2102N “will not work”.
Both boards carry the same warning for some Model 15s. Nagle’s README puts it plainly: some machines have an RF noise-suppression capacitor across the keyboard contacts, and “the capacitor used is large enough to cause typing errors with this board”. The fix is to disconnect it, and the same caution applies to any low-voltage board with a sensitive keyboard input. A big capacitor across the contacts is the 1950s cure for arcing (above); a sensitive modern sense circuit sees it as a slow edge.
Why the one-switch version does not work. A circuit that turns up in forum posts and sketches puts a single MOSFET on the low side of the magnet and a diode from its drain into a “catch” capacitor, on the reasoning that the kickback will charge the capacitor and the capacitor will help the next mark. The first half happens. The second cannot, as drawn: nothing connects the charged capacitor back to the coil when the next mark begins, because the coil’s top end is tied to the supply and the only switch is at the bottom. The energy has nowhere to go, so the capacitor charges higher on every break until a bleeder resistor or a zener burns the energy off, which makes the circuit an ordinary clamp after all. To reuse the energy, something must switch the capacitor across the coil at the start of the mark. In the DeRamp board that is the solid-state relay; in Nagle’s board it is the dump path from the boost capacitors; and in Design B below it is a second MOSFET at the top of the coil.
2.7 Design B: a cool driver — the asymmetric half-bridge
Design B is the build-your-own version of the same idea, arranged the way motor and stepper drivers arrange it. It is a small, cool replacement for the 120 V supply and its 25 W ballast resistor, and it is the one to build if heat or safety is the reason for replacing a classic supply.
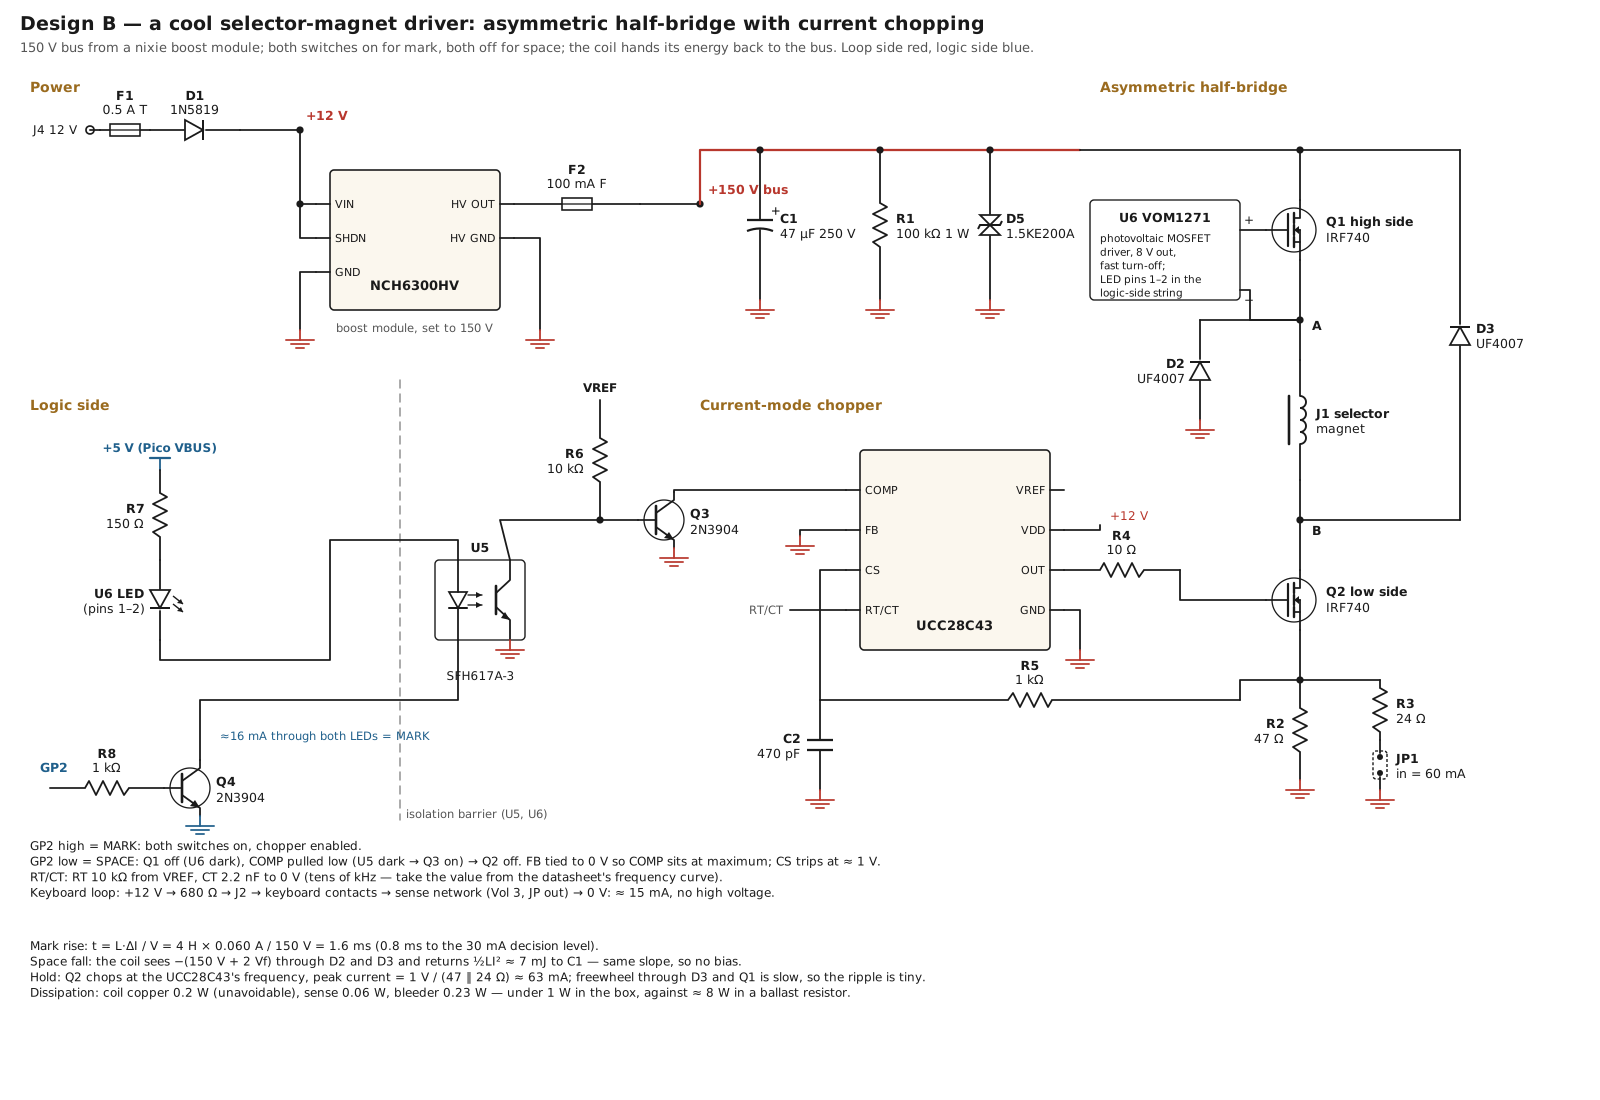
The bridge. Two N-channel MOSFETs, one at each end of the coil, and two fast diodes crossing the other way. That is all an asymmetric half-bridge is.
-
Mark: both switches on. The full bus voltage sits across the coil, and the current rises almost linearly:
t = L x dI / V = 4 H x 0.060 A / 150 V = 1.6 ms to full current
                                        0.8 ms to the 30 mA decision level
with the 4 H figure from Trammell Hudson’s notes (Vol 1).
-
Hold: chop the low side. Once the current reaches its set point, the controller turns Q2 off for a moment. The current then circulates through D3 and Q1, with almost no voltage across the coil, so it decays with the coil’s own 73 ms time constant: in a few tens of microseconds it falls by a few microamperes. Q2 turns back on, the bus tops the current up, and the cycle repeats. The ripple is negligible and nothing gets hot.
-
Space: both switches off. The coil’s current now has only one path: up from ground through D2, through the coil, and through D3 into the bus. The coil sees the whole bus voltage in reverse, so the current falls exactly as fast as it rose, and its stored energy, about 7 mJ, goes back into the 47 µF bus capacitor instead of into a resistor or a zener.
loop_sim.py puts numbers on the symmetry: 0.80 ms from the mark edge to 30 mA, 0.77 ms from the space edge, a bias of −0.1 per cent. It is the fastest and the most symmetrical of the designs in Vol 1’s figure.
The bus: 150 V from a nixie module. A nixie-tube boost module makes a convenient bus: an Omnixie NCH6300HV, for example, runs from 3.7 to 15 V, has an output adjustable from 100 to 230 V, delivers 60 mA typical at 12 V in and 170 V out, and has an SHDN pin that must be pulled high to enable it. The bus hardly loads it. The energy taken at each make comes back at each break, so the module only has to supply the coil’s copper losses, about 0.2 W at 60 mA into 55 Ω. A 47 µF 250 V capacitor (C1) holds the bus; a 7 mJ return raises it by about one volt. A 100 kΩ 1 W bleeder (R1) discharges it when the power is off and absorbs any small surplus, a 1.5KE200A transient suppressor (D5) caps it, and a 100 mA fast fuse (F2) protects the module.
The chopper: a UCC28C43. The low-side switching is ordinary peak-current-mode control, the job a UCC28C43, a current production version of the classic UC3843, was made for. Its CS pin trips at about 1 V, so the sense resistor sets the current:
60 mA:  1 V / (47 ohm || 24 ohm) = 1 V / 15.9 ohm = 63 mA     (JP1 in)
20 mA:  1 V / 47 ohm                          = 21 mA     (JP1 out)
Its output can run near 100 per cent duty cycle, so during the rise it simply holds Q2 on until the current arrives. FB is tied to 0 V so that the error amplifier holds COMP at its maximum, and pulling COMP to ground stops the output. That is how the space command reaches the low side: Q3 holds COMP low unless optocoupler U5 is lit.
The high side: a VOM1271. The high-side MOSFET’s source moves with the coil, so its gate needs a floating drive. A bootstrap driver will not do, because a teletype line idles marking for minutes at a time and a bootstrap capacitor discharges. Vishay’s VOM1271 is a photovoltaic MOSFET driver: an LED and a stack of photodiodes that produce about 8.4 V at 10 mA of LED current, with a built-in fast turn-off. Its datasheet gives a turn-on time of about 53 µs and a turn-off of about 24 µs, a few thousandths of a 22 ms element. It needs no supply on the high side at all, and it is an optocoupler in its own right.
The logic side. One GPIO drives a transistor that lights two LEDs in series, U6’s and U5’s, from the Pico’s 5 V at about 16 mA. GP2 high is mark: both MOSFETs on, chopper enabled. GP2 low is space. If the Pico loses power, the loop goes to space and the machine would run open, which is why the motor relay is controlled from the same Pico: no Pico, no motor.
The keyboard. Split from the selector magnet, the keyboard loop needs no high voltage, as the DeRamp board shows. Design B feeds it from the 12 V input through 680 Ω, about 15 mA, into the same sense network as Vol 3 with its jumper set for 20 mA.
What it dissipates. The coil’s own copper, 0.2 W, which every design pays. The sense resistor, 0.06 W. The bleeder, 0.23 W. The controller and the module’s losses, a few tenths of a watt more. Under a watt in the box, against about 8 W in the ballast of a classic supply and 2.5 W in Design A. There is no heatsink.
The costs. Design B has more parts than Design A, and it has a 150 V bus inside the box, which needs the same respect as any classic loop supply: an enclosure, the bleeder, and a meter check before hands go in. Its controller frequency comes from an RT/CT pair whose value should be taken from the UCC28C43 datasheet’s frequency curve, and its parts are newer and less forgiving of a wrong connection than a resistor. Its reward is a loop that is fast, symmetrical and cold, and that a reader can build from catalogue parts. Vol 7 lists them in the printable BOM.
2.8 Bringing it up
A loop supply should be proved on a resistor before it ever sees a teletype. The steps below are written for Design A; Design B is brought up the same way, with its bus measured and discharged before the first connection.
- No load, meter only. With the meter across the output terminals (a short through the meter), the meter reads the regulated current: 20 mA with JP1 out, 60 mA with JP1 in. If it reads more, Q2 is not regulating; check R4 and the orientation of Q2.
- A dummy load. A 470 Ω, 5 W resistor in series with the meter. The current should not change. At 60 mA the resistor drops 28 V and Q1 drops the rest; touch Q1’s heatsink after a few minutes.
- A dummy inductive load. A small relay or contactor coil in series with the resistor, and a pushbutton to open the loop. Watch the drain of Q1 with a battery-powered scope: on each opening it should rise to about 96 V and stop, with no ringing above that.
- The machine. Connect the selector magnet and keyboard. The machine should sit quietly on a steady mark. Type RYRY: the meter should read about 32 mA (Vol 1) and the copy should be clean.
- The range. Take a range on the machine’s range finder (Inside the Teletype Mechanism, Vol 1). A loop supply that narrows the range compared with the machine’s previous figure is distorting the signal; check the clamp voltage first.
2.9 Choosing a supply
Table 2 — Choosing a supply
| Approach | Supply voltage | Heat at 60 mA | Edges | Isolation | Notes |
|---|---|---|---|---|---|
| Station rectifier / Navy supply | 120–130 V | 7 W per loop in resistors | fast make, release left to the contacts | transformer | the original; heavy, and often decades past its capacitors |
| Vintage terminal unit’s internal supply (ST-6, ST-5000) | 175 V | ≈10 W | 2N5655 transistor keyer | transformer | period-correct; read the manual completely before connecting anything |
| Hobby transformer and resistor | ≈150 V | ≈9 W | fast make | transformer | the classic; avoid for new work |
| Teletype TP177010 driver (1965) | ≈40 V internal | small | forced rise, controlled discharge | transformer | the right idea, from Teletype itself |
| Design A: 48 V constant-current sink | 48 V | ≈2.5 W | symmetrical by design | the adapter | under the touch-safe limit; simple; no adjustment |
| Design B: asymmetric half-bridge, chopped | 150 V bus from 12 V | under 1 W total | fastest and most symmetrical; energy recovered | adapter + optocouplers | cool and small; more parts; a 150 V bus inside the box |
| DeRamp regenerative interface | 15 V adapter | negligible | regenerative snubber (captured 40–60 V) | the adapter | proven; a complete interface, not just a supply; $20 board |
| ttyloopdriver (John Nagle) | USB, boosted to ≈120 V | ≈1 W from USB | capacitor dump, 15 V sustain | isolated boost | open source; depends on the CP2102’s baud aliasing |
Design A is the basis of the Pico interface in Vol 3 and Vol 7, because it is the simplest thing that works; Design B drops into the same interface in place of block A when a cool, small driver matters more than a short parts list. Either one needs only two things to talk to a computer: a way for the computer to switch the magnet’s current, and a way to see the current in the keyboard loop.
2.9.1 Sources (Vol 2)
- Station rectifiers: ferroresonant transformer, 1250 µF filter, output 75/120/130 V DC at 0.20 A, taps “when output voltage exceeds 135 volts under load” / “is below 125 volts”. Teletype / Bell System Practices, Section 570-302-400, Rectifiers for Teletypewriter Station Apparatus — Wiring Diagrams, Issue 1, December 1964. https://navy-radio.com/manuals/tty/570-302-400-6412.pdf (Internet Archive copy).
- US Navy loop supplies (PP-424/U 200 mA, “each loop requires 60 milliamperes”; PP-610/U 120 V DC 125 mA; PP-1767 120 V DC 1 A plus two 60 mA outputs, magnetic-amplifier regulation, AN/SGA-3; PP-3494A/UG regulated 48 or 120 V DC, 0.4 A) and the photographs of the PP-1767 and the CV-3510 test-set loop supply with its 28 V to 120 V converter. navy-radio.com, “US Navy Teletype Loop Supplies” and “Teletype Terminal Units” pages. https://navy-radio.com/tty-loop.htm ; https://navy-radio.com/rtty-tu.htm (read through the Internet Archive). PP-3494A manual: NAVSHIPS 94971, https://navy-radio.com/manuals/tty/pp3494a-man.pdf
- HAL ST-6: internal 175 V 60 mA loop supply; 2500 Ω loop pot replaced by a fixed 2750 Ω 20 W resistor. HAL ST-5000: 175 V 60 mA supply; slicer drives a 2N5655 high-voltage switching transistor; lethal-shock warning. https://navy-radio.com/rtty/hal/st6/manual/ST6_Manual.pdf ; https://navy-radio.com/rtty/hal/st5000/manual/ST5000_Manual.pdf
- TP97301 filter unit “to suppress radio frequency induction from the line relay contacts”. Bell System Practices, Section 572-008-201, Issue 2, October 1957. https://navy-radio.com/manuals/tty/tt572/572-008-201-iss2-5710.pdf
- TP177010 selector-magnet driver (≈40 V supply, forced rise, controlled discharge): see Vol 1 sources, Section 570-224-100.
- DeRamp current-sense jumper must always have a shorting jumper or meter fitted; 15 V adapter; regenerative snubber. Mike Douglas, DeRamp Model 15 interface user manual. https://deramp.com/downloads/teletype/Model%2015/loop%20interface%20board/User%20Manual.pdf
- Mean Well GST25A48-P1J: 48 V, 0.52 A, 25 W desktop adapter, 2.1 × 5.5 mm plug (Digi-Key 1866-2095-ND). https://www.meanwell.com/ ; distributor listings read 2026-11-03.
- IRF740 (400 V N-MOSFET), 2N3904, 1N4756A (47 V 1 W zener), 1N4742A (12 V 1 W zener): manufacturers’ datasheets (Vishay, onsemi). Values and calculations are this dive’s; see
03-outputs/tools/loop_sim.pyand03-outputs/tools/draw_schematics.py. - Incandescent-lamp ballast: the physics (positive temperature coefficient of a tungsten filament) is standard; no period hobby article specifying a particular lamp was located for this volume. ⟨open: a period example would be worth adding⟩
- DeRamp regenerative snubber (“captures 40v-60v … dumped back into the loop”), voltage boost (+20/30/40 V), Baudot pass-through, pulling-magnet 0 Ω / holding-magnet 150 Ω 1 W R2, PIC16F1824, 15 V adapter; parts list (C1/C2 1.0 µF 250 V ceramic, D1–D3 FR104, T1/T2 TN5325N3, U1 LH1505AB-class solid-state relay, L1 100 µH). Mike Douglas, user manual and 60ma Teletype Loop Driver schematic Rev A (April 2022). https://deramp.com/downloads/teletype/Model%2015/loop%20interface%20board/ ; product page https://deramp.com/model15_interface.html
- Video: “Interfacing the Teletype Model 15,” YouTube. https://youtu.be/fLkBb9MuTjE
- ttyloopdriver: LT3750 capacitor-charging boost to about 120 V, 1 µF dump capacitors, 15 V sustain, depletion-mode MOSFET at 60 mA, about 1 W from USB, CP2102 600→45 baud aliasing (CP2102N will not work), v3.3 drives a Model 15, RF-suppression-capacitor warning; GPL-3.0. John Nagle. https://github.com/John-Nagle/ttyloopdriver
- NCH6300HV boost module: 3.7–15 V in, 100–230 V adjustable, 60 mA typical at 12 V in / 170 V out, SHDN high to enable, no reverse-polarity protection. Omnixie datasheet v1.0 (2020). https://media-cdn.elecrow.com/media/qb/tmp/common/file/2023/09/NCH6300HV_Datasheet_EN_v1.0-final_28dece39a6d0c7161d5fbe3bf464494f.pdf
- VOM1271 photovoltaic MOSFET driver: 8.4 V typical open-circuit at 10 mA, turn-on about 53 µs, turn-off about 24 µs, integrated fast turn-off. Vishay, document 83469. https://www.vishay.com/en/product/83469
- UCC28C43: near-100 % duty cycle; frequency from RT/CT curves; current-sense threshold about 1 V (confirm in the electrical characteristics table). Texas Instruments, UCC28C4x datasheet. https://www.ti.com/product/UCC28C43
- UF4007 (1000 V, 1 A ultrafast), 1.5KE200A TVS (171 V standoff): manufacturers’ datasheets. Design B values and arithmetic are this dive’s; simulation in
03-outputs/tools/loop_sim.py. - Cross-links: Making the Parts That No Longer Exist, Vol 2 (DeRamp); The Teletype Model 15, Vol 6 (loop supplies for that machine); RTTY on the Air, Vol 2 (terminal units).